
Who doesn’t like a good silhouette? I’ve put together a tutorial on an easy way to make one in Photoshop.
If you do not already have it, you can download a 30 day trial of Photoshop from Adobe. All keyboard shortcuts provided are for CS5 on a PC, they may vary slightly for other CS versions or Mac platform.
- Open your picture that you want to create a silhouette from in Photoshop.

- Change the image mode to grayscale (black and white) select Image > Mode > Grayscale.
- Add an adjustment layer and tweak the brightness/contrast so that there is a greater difference between light and dark in the photo.
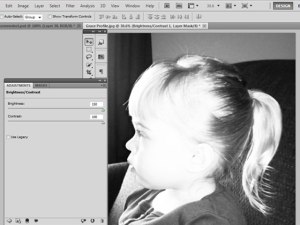
- Zoom in (CTRL + +) to make it easier to see the details of the outline you want to make.
- Create a new layer and temporarily lower the opacity of it to between 40% – 60%.

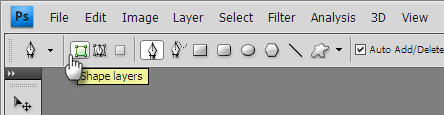
- Select the Pen Tool from the Tools palette (P).

- Select the “Shape Layers” Option In The Options Bar.
- Set the foreground and background colors to their defaults of Black and White (D).

- Draw an outline around the subject in the photo by clicking with your mouse. Click close together around delicate parts of the outline or click further apart when straight lines are reasonable for the outline. Smooth out/round off flyaway hairs or uneven patches along the hair line. Close your path by connecting your last and first points.

- Now go back and raise the opacity of the silhouette layer back to 100% and hide all layers but your silhouette layer to view the finished silhouette.

- Zoom in (CTRL + +) a bit, notice the edges are a bit jagged? We’ll fix that. Select the Magic Wand Tool (W) from the Tools pallet and then click anywhere on the silhouette, you will now see what is called a line of “marching ants” outlining your path.
- Add a layer mask by clicking on the Add Layer Mask button. A layer mask has a double border if it’s active and single one if it’s not active. You want it to be active.

- Go in the menu to Filter > Blur > Gaussian Blur, and move the slider to adjust the pixel radius. Blur the mask just enough to see the jagged edges disappear into the blur. In my case a value of 10 pixels was enough.

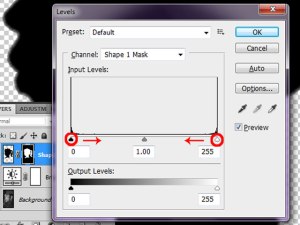
- Open the Levels dialog box (CTRL + L). Move the black slider to the right and stop when close to the center, and then move the white slider to the left. The edge of the mask is gets sharper with each move to the right. Stop when it looks the sharpest. Click Ok.
- (Optional) Save (CTRL + S) your silhouette as a psd file. In the event you want to use it again, you eliminate the need to create the outline again.
- Create a new document (CRTL + N) in the size of your choice for final output (mine will be a 5×7) with a 300 ppi and a white background.

- In the silhouette document, select all (CTRL + A) and copy (CTRL + C). Now go to the new document and paste (CTRL + V).
- Close out of the silhouette document window. We no longer need it.
- (Optional) In the new document, turn on your document grid (CTRL + ‘) to help with precise placement of your silhouette and Snap to Grid (View > Snap), and then make sure Snap to Grid is checked (View > Snap To > Grid).
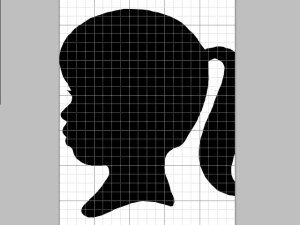
- (Optional) Turn on the ruler (CTRL + R), drag from the horizontal ruler to create a horizontal guide, drag from the vertical ruler to create a vertical guide. Now you know the exact center of your document.
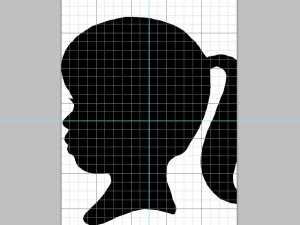
- Time to make your silhouette fit your document. Make sure the layer with your silhouette is selected and bring up the Free Transform box and handles around the silhouette (CTRL + T ). Pick a corner, wait for the cursor to change,now hold down your SHIFT + ALT keys as you drag to resize it. By doing this your proportions will be constrained and the shape will resize from its center. Hit enter to accept the transformation.
- Reposition the silhouette by clicking anywhere inside the box and dragging it around with your mouse. Press Enter to accept the transformation and exit out of the Free Transform command.
- (Optional) Add Additional Silhouettes to the document using the same steps.
- Save (CTRL + S) your silhouette.
You now have a traditional black and white silhouette!  Leave as is, or take it further by adding a frame, some text, a texture, a pattern or changing the foreground/background colors. The posibilites are endless!

